Articles by EJA Members
Star Effect in Photoshop
by Nancy of NTroske.Etsy.com
A star effect is often used in jewelry photography to create a beautiful highlight on a bead, gemstone or precious metal. These directions are for Photoshop but you can use any photo editing software that has a paintbrush option that allows you to load different shaped brushes.
The first step is to locate a set of star brushes. I typed “Photoshop Star Brushes” into Google and came up with many choices. I chose a site that offered free brushes:
This is the link to the star brushes but there are many other fantastic brushes available there as well. Download the star brushes into your Photoshop Brushes folder. The next time you open Photoshop you should see the new star brushes in your brush drop down menu:
http://www.photoshopbrushes.com/brushes/28.htm
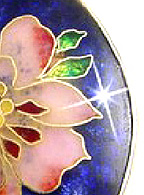
Now choose a photo that would be well suited to the star highlight. A word of caution – it is easy to get carried away with this effect so try to use it sparingly! I look for photos with dark backgrounds or photos where the area to be highlighted is dark enough to see the white star placed over it.
Before starting any editing work on a photo I always copy my original to a new layer. To do this, drag the original layer on to the “create a new layer” icon as shown below. Always work on the copy. You can make as many copies as you need and if you don’t like the results, drag that working layer to the trash can to dispose of it. Don’t throw away your original. There are other ways to go back a few steps but I like this method because you can compare your results by turning the eye icon on or off. I’ve put a red arrow to show you where to drag and drop the layer you are copying.
The next thing to do is make sure white is chosen for your foreground color.
Now to create the highlight. Click the brush icon and make sure you have loaded your star brushes . When you click the brush tool the options for brushes will appear at the top. Click the small arrow next to the brush to see the drop down menu of size choices. (I’ve placed a red box around this arrow).
Create new layer above the other layers and name it Star. Choose a sparkle shaped star. I chose brush size 60. Find the area that has a natural highlight and click over it. The star will appear!
Now you can play around with the star to see what works best. You can move it to see where it shows up best. You can duplicate the layer and play with different positions for the star.
Some more options are:
Rotate the star.
Make the star bigger or smaller.
Make the star less opaque by playing with the opacity setting.
Copy the star layer and merge it with the one below it for a brighter star.
Copy the star layer and rotate the top one slightly to give the star more rays.
Play around with the diameter and hardness sliders in the brush drop down menu.
Tone down or remove other highlights that might be present in the photo to enhance the eye-catching essence of the star by using the clone tool.
Use the burn tool and a soft edged brush to slightly darken the area below the star, effective if the image under the star is light colored.
If you have any questions please feel free to email me at: info@nancytroske.com